
Table of Contents
Lead scoring is one of the most powerful tools in HubSpot that can supercharge your sales and marketing efforts. By prioritizing your leads based on their engagement and profile, your team can focus on the hottest prospects turning more leads into paying customers.
In this post, we’ll break down how to set up lead scoring in HubSpot step by step, along with best practices to help you optimize your strategy.
What is Lead Scoring?
Lead scoring is the process of assigning numerical values (points) to leads based on how likely they are to convert into customers. These scores are based on criteria like:
- Demographic data (industry, company size, location)
- Behavioral data (website visits, form submissions, email opens)
- Engagement history (downloads, webinar attendance, etc.)
In HubSpot, lead scoring helps sales teams identify qualified leads and prioritize outreach accordingly.
Why Use HubSpot for Lead Scoring?
HubSpot’s built-in Predictive Lead Scoring (available in Professional and Enterprise plans) uses AI and machine learning to automatically evaluate leads. But even with the free or Starter versions, you can manually set up custom scoring rules to meet your goals.
Benefits include:
- Better alignment between marketing and sales
- Increased conversion rates
- Shorter sales cycles
- Higher ROI on lead generation
How to Set Up Lead Scoring in HubSpot
Here’s a step-by-step guide to building your own lead scoring model in HubSpot:
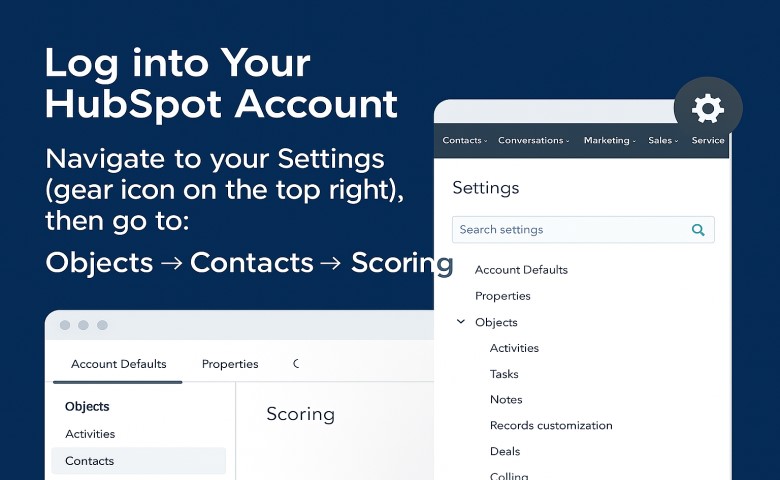
1. Log into Your HubSpot Account
Navigate to your Settings (gear icon on the top right), then go to:
Objects → Contacts → Scoring.
2. Understand the Two Types of Scores
In HubSpot, you’ll find:
- Positive attributes: Add points when a lead takes desired actions or fits your ideal customer profile.
- Negative attributes: Subtract points when a lead shows signs of low intent or doesn’t match your ideal persona.
You can use both to refine the score and qualify better leads.
3. Define Your Ideal Lead Profile
Start by outlining key criteria. Ask yourself:
- Who is your ideal customer?
- What job title, company size, or industry are you targeting?
- What behaviors signal interest (e.g., visiting pricing page, downloading an eBook)?
Use data from your past conversions to guide your scoring logic.
4. Add Positive Scoring Attributes
Click “Add criteria” under Positive Attributes. Some examples:
- Job title is ‘CEO’ → Add 10 points
- Visited pricing page → Add 15 points
- Opened marketing email → Add 5 points
- Clicked CTA in blog post → Add 8 points
Tip: Assign more points to higher intent actions (e.g., demo requests > blog visits).
5. Add Negative Scoring Attributes
Under Negative Attributes, subtract points for disqualifying behaviors. For example:
- Email contains @gmail.com → Subtract 10 points
- Unsubscribed from email → Subtract 20 points
- Industry is ‘Student’ (if B2B only) → Subtract 15 points
This helps your team avoid wasting time on low-fit leads.
6. Test and Save Your Score Model
Once all rules are in place:
- Click Save.
- Let HubSpot start calculating scores for all contacts.
- You can create filters or segments based on these scores, like “Score > 50” to identify MQLs (Marketing Qualified Leads).
How to Use Lead Scores in Workflows and Segmentation
Once scores are applied, you can:
- Trigger email workflows for high-score contacts
- Alert sales reps when leads cross a score threshold
- Automatically assign contacts to sales pipelines
- Create dashboards for lead tracking
Example:
When a lead score reaches 80 → send to sales → notify rep → enroll in high-intent workflow.
Best Practices for Lead Scoring in HubSpot
- Review scoring rules quarterly – business goals and user behaviors change.
- Avoid overcomplicating – start simple with a few key attributes.
- Use both profile + behavioral data – ideal scoring is a blend of both.
- Align sales & marketing teams – ensure both agree on what defines a good lead.
- Use historical data – look at your closed-won deals to see what patterns they share.
Lead Scoring Example Template
| Attribute | Points |
|---|---|
| Job Title = “Marketing Director” | +10 |
| Downloaded Whitepaper | +15 |
| Visited Pricing Page | +20 |
| Unsubscribed from Emails | -25 |
| Company Size < 5 Employees | -10 |
| Email Contains “@yahoo.com” | -5 |
Final Thoughts
Lead scoring in HubSpot isn’t just about assigning numbers it’s about making smarter decisions with your data. When done right, it helps you align your marketing and sales teams, focus on high-intent leads, and close more deals efficiently.
Whether you’re using the free plan or an advanced version of HubSpot, implementing a solid lead scoring system can dramatically improve your conversion outcomes.
Start today define your best customer, track behaviors that matter, and watch your pipeline become more productive than ever.